.:: Jasa Membuat Aplikasi Website,Desktop,Android Order Now..!! | | Order Now..!! Jasa Membuat Project Arduino,Robotic,Print 3D ::.

No connection could be made because the target machine actively refused it

0 komentar
Not able to send email using code

One of the developers in my office came to me and said that he is not able send the mails from his code but at same time someone else with same code is able to send the same mail. I did a cross check and found that there was no issue in firewall permission.

I did Google search for this and it said the same thing that check for your firewall setting and check if that port is blocked but after all the testing I found culprit was Antivirus. So if you get this problem do check following things

1) First thing that you should check is turn of your antivirus for a short duration and check if it�s working fine. If it works fine after turning off the antivirus add the IP and port in trusted zone of antivirus.
2) If it does not work after this also you should disable your firewall with antivirus and check it. If it�s working add the IP/port in trusted zone of firewall.
3) If still you are getting problem please talk to your network admin make sure that required IP and required port is accessible from your computer.

You can comment here with your email id if you find any problem I will come back to you in short time

Hope it solved your problem

Thanks for being here
Suni

Web Packaging: Creating web packages using MSBuild

0 komentar


This post is next in the series of VS 2010 articles that we have been putting together to dive into the Web Deployment improvements with VS 2010 and IIS.  I would recommend reading the the preceding posts to get an overview of all the scenarios supported:

In this post I will cover web package creation using MSBuild command line.  Many medium to large sized teams plan on automating their build process for various good reasons like predictability for QA team, time saving as compared to on-demand manual build, early bug detection with Build Verification Tests (BVTs), knowing the current state of project integration, etc� Many argue that setting up the build system is not worth the trouble for a small project running only a few months; I would suggest otherwise, believe me setting up an automated build process once will pay you back   enough just within a few weeks and will get you into a mode where in the future doing this will be so much more easier� 

Anyways, if you choose to automate your build process there are various tools and technologies available out there, some of the popular ones are:

You can certainly take your build automation process to its best by using Continuous Integration model which we will discuss in subsequent posts.

In anycase, the entire Web Deployment story in VS 2010 uses MSBuild behind the scene which means that all the UI features in Visual Studio are actually wrappers over the underlying MSBuild Targets, Tasks and Properties.  In the previous post we talked about �Creating a Web Package using VS 2010� where we discussed setting up the Package properties in �Package Tab� of the project�s property pages as shown below:

All the properties that you set up in this UI are stored in your .vbproj or .csproj file.  We also talked about this tab being �Configuration� aware, which means that you can set different properties per build environment like Debug, Testing, Staging, Release/Production etc and all of these properties will be saved in your project file.

Now if you would like to create a web package using MSBuild it is much more simpler than you can imagine:

All you have to do is open  command prompt which has MSBuild path preset (e.g. Visual Studio Command Prompt which is available under Visual Studio 2010 �> Visual Studio Tools) and type the below command:

MSBuild "YourFullyQualifiedProjectName.csproj/vbproj" /T:Package

/T:Package is the MSBuild Target named Package which we have defined as part of implementation of the Web Packaging infrastructgure.

Interestingly, when you do not specify any MSBuild target, then for most projects �Build� is the default target hence just providing below command line simply builds your project

MSBuild �YourProject.csproj�

Also note that there can be various dependencies set between targets and our �Package� target has an explicit dependency on �Build� target which means that if the �Build� was not successful then �Packaging� will not even begin, this ensures that during your automated packaging you do not land up spending resources on creating faulty web packages.

By default MSBuild uses the �Debug� configuration but if you would like to create a package for your Staging configuration all you would have to do is:

MSBuild "ProjectName.csproj/vbproj" /T:Package /P:Configuration=Staging

/P:Configuration represents the Property named Configuration which you are setting to Staging�

Diving a tiny bit deeper - If you open your project file in a text editor then you should be able to see all the properties which we talked about from UI perspective in our previous post �Creating a Web Package using VS 2010��  All these properties will not be visible in the project file until their default values are modified (just a tiny optimization to keep the files smaller and agile :-)). These same properties are optionally settable from command line as well...  Also there are certain properties which are not manifested in the UI or in the project file by default, but are still available behind the scene to provide extensibility and fine grain control that many expect, we will go into the details of those properties in later posts as well.

Anyways, most of the time you should be able to set most of your properties in the UI and use them without much modification in the command line scenario, although it is conceivable that some of the properties may require frequent modification during automated builds e.g. �Package Location�.  Below is a sample command of how you will set up the PackageLocation property along with the Configuration property:

MSBuild "MyProjectName.csproj" /T:Package /P:Configuration=Staging;PackageLocation="D:\Vishal\Package.zip"

When I run the above command then my package for �Staging� configuration will be created in �D:\Vishal\Package.zip�

It is important to note that items passed via command line override the values set in the project file, this ensures that most common values of the properties can be stored in the project file and eventually shared by the entire team�  The ones which need to be momentarily overridden during build time can be set from the command line. 

Also it is good to remember that if you like to pass more than one property to MSBuild command then you can do so by separating multiple properties by semicolon ; as shown above for Configuration and PackageLocation.

The above command line examples can very easily be plugged into automated build systems like CC.Net, TFS, etc, we will look into the process of setting some of these environments in later posts as well.

For now, I hope you will be able to envision the prospects of creating these Web Packages in an automated fashion and share them across your teams on regular basis.

Suni

Metal Gear Acid

0 komentar
The Metal Gear Series sneaks its way to mobile! Solid Snake mustinfiltrate the enemy to foil a terrorist hijacking. Get ready toexperience deep tactical espionage as you plan your strategy to defeatthe enemy and accomplish missions in this new Metal Gear game.


Download, S60 V3 = For 240*320 Click Here,
For 320*240 Click Here
For 176*208 Click Here
S60 V2 = For 176*208 Click Here


Metal Gear Solid 3D

An exclusive chapter in the Metal Gear franchise for cellphone owners.In the game, players will face the same extreme tension of solitaryinfiltration that fans of the classic tactical espionage action gamehave come to expect from the Metal Gear Solid series, previouslyreleased to the PlayStation and PlayStation 2. Metal Gear Solid Mobilefeatures never-before-seen dramatic 3D art displays and camera workthat greatly surpass the current standard of mobile games. The gamealso takes advantage of the phone's camera functionality, for exampleusing the camera to sample colors from the real world for an in-gamecamouflage system. It is also possible to shift the viewpoint fromfirst to third person in the game to control a variety of weapons.


Download
Suni

Download N-Gage Game Application

0 komentar

Collection of the best games for smartphone Nokia N-Gage. In the archives unpacked games, and in the format of * blz. for the installation * blz its necessary program to install games (already in the complete set)

Games Include:


1)Alien Front
2)Ashen
3)Asphalt UGT
4)Asphalt.Urban.GT.2
5)Atari Master Pieces Vol.1
6)Atlantis Redux
7)Backbone Entertainment Rifts
8)Barakel
9)Bomberman
10)Call of Duty
11)Capcom Catan
12)Civilization
13)ColinMcRae2005
14)Crash Nitro Kart
15)Fifa 2004
16)Fifa 2005
17)Fifa 2006
18)Flo Snowboarding
19)Ghost Recon
20)Glimmerati
21)High Seize
22)HinterWars
23)InterstellarFlames
24)King of Fighters
25)Marcel Desailly Pro Soccer
26)Mile High Pinball
27)Mlb Slam
28)Monkey Ball
29)Moto GP
30)Motocross Free Style
31)NCAA Football 2004
32)One
33)Operation Shadow
34)Pandemonium
35)Pathway To Glory
36)Pocket Kingdom
37)Puyo Pop
38)Puzzle Bobble VS
39)Rayman 3
40)Red Faction
41)Requiem Of Hell
42)Rifts - Promise of Power
43)Sango Fighters
44)Sega Rally
45)Snakes
46)SonicN
47)Spiderman2
48)Splinter Cell - Chaos Theory
49)Splinter Cell - Team Stealth Action
50)SSX Out Of Bounds
51)System Rush
52)Tantalus Payload
53)The Elder Scrolls Travels Shadowkey
54)The Roots Gates of Chaos
55)The Sims Bustin Out
56)Tiger Woods
57)Tomb Rider
58)Tony Hawks Pro Skater
59)Virtua Cop
60)Virtua Tennis
61)Warhammer 40,000 Glory in Death
62)Worms World Party
63)WWE Aftershock
64)Xanadu.Next
65)X-Men II - rise of the Apocalypse
66)X-Men Legends

Download:

[DepositFiles]

http://depositfiles.com/files/534580/Ngage.part01.rar
http://depositfiles.com/files/534588/Ngage.part02.rar
http://depositfiles.com/files/534583/Ngage.part03.rar
http://depositfiles.com/files/534591/Ngage.part04.rar
http://depositfiles.com/files/534582/Ngage.part05.rar
http://depositfiles.com/files/534587/Ngage.part06.rar
http://depositfiles.com/files/534589/Ngage.part07.rar
http://depositfiles.com/files/534592/Ngage.part08.rar

[RapidShare]

http://rapidshare.com/files/12069893/Ngage.part01.rar
http://rapidshare.com/files/12071578/Ngage.part02.rar
http://rapidshare.com/files/12071264/Ngage.part03.rar
http://rapidshare.com/files/12071062/Ngage.part04.rar
http://rapidshare.com/files/12070876/Ngage.part05.rar
http://rapidshare.com/files/12070674/Ngage.part06.rar
http://rapidshare.com/files/12070446/Ngage.part07.rar
http://rapidshare.com/files/12070191/Ngage.part08.rar
http://rapidshare.com/files/12070006/Ngage.part09.rar

Suni

Ponsel Internet Banyak Diburu

0 komentar
Sebuah toolkit pengembangan software baru telah dirilis untuk Android, sebuah sistem operasi open source pada mobile yang disponsori oleh Google. Software tersebut diberi nama Android SDK Versi 0.9, dan diumumkan pada Senin lalu dalam Android Developers Blog. Sebuah versi baru dari software Android ini akan dirilis resmi pada bulan November.

Menurut Google Developer Advocated, Dan Morrill dalam Android Developers Blog, sejak dirilisnya software Android SDK Versi 0.9, Google telah bekerja sama dengan Open Handset Alliance untuk menggerakkkan pengembang dan bersiap untuk peluncuran device pertama pada kuarter keempat tahun ini. SDK versi beta ini merupakan langkah maju dari peluncuran Android 1.0, dan menurut Morill, SDK versi beta ini lebih stabil dan tidak ada perubahan yang berarti.

Walaupun begitu, namun terdapat satu perubahan pada layar UI (User Interface) yang baru. Aplikasi software untuk mobile ini termasuk jam alarm, kalkulator, kamera, music player, picture viewer, dan pesan text SMS atau MMS. Selain itu, Android SDK Versi 0.9 ini juga memiliki tool pengembangan seperti graphic preview untuk layout XML bagi pengguna Eclipse, plus API (Application Programming Language) baru, yang menurut Morill, telah diperbaiki dari bug-bug yang ada di versi sebelumnya.

Al Hilwa, program director di perusahaan penelitian IDC, mengatakan bahwa apapun dari Google pasti mengesankan, namun Hilwa juga menuturkan bahwa Android disadari hukan hal yang potensial dalam beberapa waktu. Hilwa mengungkapkan, dalam dua atau tiga tahun ke depan, Android akan menjadi hal yang biasa saja, ketika semua smartphone akan menggantikan posisi laptop atau PC.

sumber: beritanet.com

Untuk Android Goggle System Anda bisa lihat di code.google.com/android
Suni

Menghapus Baris Pada DataGridView

0 komentar


Masih seputar DataGridView, sekarang kita membahas bagaimana menghapus baris pada DataGridView. cara nya sangat mudah, masih menggunakan DataBase dan Table yang sama (artikel sebelumnya) ketikkan sintaks berikut :

�Private Sub DataGridView1_UserDeletingRow(ByVal sender As Object, ByVal e As System.Windows.Forms.DataGridViewRowCancelEventArgs) Handles DataGridView1.UserDeletingRow
�� � � �Dim id As String = e.Row.Cells("ISBN").FormattedValue.ToString()'Mengambil value untuk pada field ISBN
�� � � �Dim name As String = e.Row.Cells("Title").FormattedValue.ToString() 'Mengambil Value untuk field Title
'Menampilkan windows dialog
�� � � �Dim result As DialogResult = MessageBox.Show("Are you sure you want to delete ISBN " & id & " - " & name & "?", "Delete?", MessageBoxButtons.OKCancel)
'Jika button Cancel yang di pilih maka proses akan di hapus.
�� � � �If result = DialogResult.Cancel Then
�� � � � � ��� � � � � �e.Cancel = True
�� � � �End If

Note : Untuk menghapus tekan tombol "Delete" pada keyboard. Dan proses ini tidak menghapus baris pada Table tapi hanya pada tampilan DataGridView

Wassalam
Suni

Menambahkan Control DrodpDownList Pada DataGrid View

0 komentar

Artikel ini masih berkaitan dengan DataGridView, kenapa banyak sekali artikel/tips penulis seputar DatGridView??? Karena Component ini sangat sering digunakan oleh para developer, jadi harus terus di gali fungsi-fungsi nya. Langsung masuk aja ke pembahasan, sesuai dengan judul nya menambahkan control DropDownList pada DataGridView. Untuk .Net Framework 2.0 keatas, cara ini tidak sesulit atau serumit pada versi di bawah nya..
Di asumsikan kita sudah memiliki Database dengan nama Table "T_Titles", dan salah satu field nya adalah "Authors".�
Note : Untuk cara koneksi ke Database di asumsikan sudah bisa, jika belum silahkan liat artikel penulis yang pertama.
Berikut sintaks nya.. (ketik sintaks ini pada��Private Sub F_DataGrid_Load)

�� � � 'Start Menampilkan data pada Datagrid View
�� � � �Dim cmd As OleDbCommand = New OleDbCommand("Select * from T_Titles", � � � � � myconnection.open)
�� � � �cmd.CommandType = CommandType.Text
�� � � �Dim adapter As OleDbDataAdapter = New OleDbDataAdapter(cmd)
�� � � �Dim datatbl As DataTable = New DataTable
�� � � �Dim ds As DataSet = New DataSet()
�� � � �' Mengambil info column (Read-only).
�� � � �adapter.FillSchema(ds, SchemaType.Mapped, "Titles")
�� � � �' Isi table
�� � � �adapter.Fill(ds, "Titles")
�� � � �datatbl = ds.Tables("Titles")
�� � � �myconnection.close()
�� � � �DataGridView1.DataSource = datatbl
�� � � �'Finish Menampilkan data pada Datagrid View

�� � � �'Menghapus auto generate Authors Colomn
�� � � �DataGridView1.Columns.Remove("Authors")
�� � � 'Membuat List columns untuk Authors field
�� � � �Dim listCol As DataGridViewComboBoxColumn = New DataGridViewComboBoxColumn()
�� � � �'Posisi column nomor 2
�� � � �listCol.DisplayIndex = 1
�� � � �'Nama Header= "Authors"
�� � � �listCol.HeaderText = "Authors"

�� � � �'Masukkan nama field pada table yang akan di buat listcolom
�� � � �listCol.DataPropertyName = "Authors"
�� � � 'Mengisi list dari T_Titles table
�� � � �listCol.DataSource = ds.Tables("Titles")
�� � � �listCol.DisplayMember = "Authors"
�� � � �listCol.ValueMember = "Authors"
�� � � 'Tambahkan column
�� � � �DataGridView1.Columns.Add(listCol)

Selamat mencoba...
Wassalam..

Suni

A Comprehensive Database Security Model

0 komentar

This week I am taking a bit of a departure. Normally I write
about things I have already done, but this week I want to
speculate a bit on a security model I am thinking of coding
up. Basically I have been asking myself how to create a
security model for database apps that never requires elevated
privileges for code, but still allows for hosts sharing multiple
applications, full table security including row level and
column level security, and structural immunity to SQL injection.


The Functional Requirements


Let's consider a developer who will be hosting multiple
database applications on a server, sometimes instances of the
same application for different customers. The applications
themselves will have different needs, but they all boil down
to this:


  • Some applications will allow surfers to join the site
    and create accounts for themselves, while others will be
    private sites where an administrator must make user accounts.
  • Some applications will not contain sensitive data, and
    so the site owner wants to send forgotten passwords in email
    -- which means the passwords must be stored in plaintext. Other
    site owners will need heightened security that disallows
    storing of passwords in plaintext.
  • In both cases, administrators must of course be able to
    manage accounts themselves.
  • The system should be structurally immune
    to SQL injection.
  • It must be possible to have users with the same user id
    ("Sheilia", "John", etc.) on multiple applications who are
    actually totally different people.
  • The application code must never need to run at an
    elevated privelege level for any reason -- not
    even to create accounts on public sites where
    users can join up and conduct transactions.
  • It must be possible for the site owners or their
    agents to directly
    connect to the database at very least for querying and
    possibly to do database writes without going through our
    application.
  • Users with accounts on one app must never be able to
    sign on to another app on the same server.


These requirements represent the most flexible possible
combination of demands that I have so far seen in real life.
The question is, can they be met while still providing
security? The model I'd like to speculate on today says
yes.

Informed Paranoia Versus Frightened Ignorance


Even the most naive programmer knows that the internet
is not a safe place, but all too often a lot of security
advice you find is based on frightened ignorance
and takes the form, "never do x, you don't know what might
happen." If we are to create a strong security model,
we have to do better than this.


Much better is to strive to be like a strong system architect,
whose approach is based on informed paranoia.
This hypothetical architect knows everybody is out
to compromise his system, but he seeks a thorough knowledge
of the inner workings of his tools so that he can
engineer the vulnerabilities out as much as possible.
He is not looking to write rules for the programmer
that say "never do this", he is rather looking to make it
impossible for the user or programmer to compromise
the system.


Two Examples


Let us consider a server hosting two applications, which
are called "social" and "finance".


The "social" application is a social networking site with
minimal security needs. Most important is that the site
owners want members of the general public to sign up, and
they want to be able to email forgotten passwords
(and we can't talk them out of it) -- so we
have to store passwords in plaintext.


The "finance" application is a private site used by employees
of a corporation around the world. The general public is
absolutely not welcome. To make matters worse however, the
corporation's IT department demands to be able to directly
connect to the database and write to the database without
going through the web app. This means the server will have
an open port to the database. Sure it will be protected with
SSL and passwords, but we must make sure that only users
of "finance" can connect, and only to their own application.


Dispensing With Single Sign-On


There are two ways to handle connections to a database. One
model is to give users real database accounts, the other is
to use a single account to sign on to the database. Prior to
the web coming along, there were proponents of both models in
the client/server world, but amongst web developers the single
sign-on method is so prevalent that I often wonder if they
know there is any other way to do it.


Nevertheless, we must dispense with the single sign-on method
at the start, regardless of how many people think that Moses
carved it on the third tablet, because it just has too many
problems:


  • Single Sign-on is the primary architectural flaw that makes
    SQL injection possible
    . As we will see later, using real
    database accounts makes your site (almost) completely immune
    to SQL injection.
  • Single Sign-on requires a connection at the maximum privilege
    level that any system user might have, where the code then decides
    what it will let a particular user do. This is a complete
    violation of the requirement that code always run at the lowest
    possible privilege level.
  • Single Sign-on totally prevents the requirement that
    authorized agents be allowed to connect to the database and
    directly read and write values.


So single sign-on just won't work with the requirements listed.
This leads us to creating real accounts on the database server.


Real Accounts and Basic Security


When you use a real database account, your code connects
to the database using the username and password provided
by the user. Anything he is allowed to do your code will
be allowed to do, and anything he is not allowed to do will
throw and error if your code tries to do it.


This approach meets quite a few of our requirements nicely.
A site owner's IT department can connect with the same
accounts they use on the web interface -- they have
the same privileges in both cases. Also, there is no
need to ever have application code elevate its privilege
level during normal operations, since no regular users should ever be
doing that. This still leaves the issue of how to create
accounts, but we will see that below.


A programmer who thinks of security in terms of what code
can run
will have a very hard time wrapping his head around
using real database accounts for public users. The trick to
understanding this approach
is to forget about code for a minute and to
think about tables. The basic fact of database application
security is that all security
resolves to table permissions
. In other words, our security
model is all about who can read or write to what tables, it is
not about who can run which program.


If we grant public users real database accounts, and they
connect with those accounts, the security must be handled
within the database itself, and it comes down to:


  • Defining "groups" as collections of users who share
    permissions at the table level.
  • Deciding which groups are allowed select, insert, update,
    and delete privileges on which tables.
  • Granting and revoking those privileges on the server itself
    when the database is built.
  • At very least row-level security will be required, wherein
    a user can only see and manipulate certain rows in a table.
    This is how you keep users from using SQL Injection to mess
    with each other's order history or member profiles.
  • Column security is also very nice to finish off the
    picture, but we will not be talking about that today as it
    does not play into the requirements.


Now we can spend a moment and see why this approach eliminates
most SQL Injection vulnerabilities. We will imagine a table of
important information called SUPERSECRETS. If somebody could
slip in a SQL injection exploit and wipe out this table we'd all
go to jail, so we absolutely cannot allow this.
Naturally, most users would have no privileges on
this table -- even though they are directly connected to the
database they cannot even see the table exists, let alone
delete from it. So if our hypothetical black hat
somehow slips in ";delete from supersecrets"
and our code fails to trap for it, nothing happens. They have
no privlege on that table. On the other side of things, consider
the user who is privileged to delete from that table. If this
user slips in a ";delete from supersecrets" he is only going to
the trouble with SQL Injection to do something he is perfectly
welcome to do anyway through the user interface.
So much
for SQL injection.


To repeat a point made above: row-level security is a must.
If you grant members of a social site global UPDATE privileges
on the PROFILES table, and you fail to prevent a SQL Injection,
all hell could break loose. Much better is the ability to
limit the user to seeing only his own row in the PROFILE table,
so that once again you have created a structural immunity
to SQL injection.


Anonymous Access


Many public sites allow users to see all kinds of information
when they are not logged on. The most obvious example would
be an eCommerce site that needs read access to the ITEMS table,
among others. Some type of anonymous access must be allowed
by our hypothetical framework.


For our two examples, the "social" site might allow limited
viewing of member profiles, while the "finance" application
must show absolutely nothing to the general public.


If we want a general solution that fits both cases, we opt
for a deny-by-default model and allow each application
to optionally have an anonymous account.


First we consider deny-by-default. This means simply that
our databases are always built so that no group has any
permissions on any tables. The programmer of the "social"
site now has to grant certain permissions to the anonymous
account, while the programmer of the "finance" application
does nothing - he already has a secure system.


But still the "finance" site is not quite so simple. An anonymous
user account with no privileges can still log in, and
that should make any informed paranoid architect nervous.
We should extend
the deny-by-default philosophy so the framework will
not create an anonymous
account unless requested. This way the programmer of the
"finance" application still basically does nothing, while
the programmer of the "social" must flip a flag to create
the anonymous account.


Virtualizing Users


If we are having real database accounts, there is one small
detail that has to be addressed. If the "social" site has
a user "johnsmith" and the finance application has a user
of the same name, but they are totally different people,
we have to let both accounts exist but be totally separate.


The answer here is to alias the accounts. The database
server would actually have accounts "finance_johnsmith" and
"social_johnsmith". Our login process would simply take
the username provided and append the code in front of it
when authenticating on the server. 'nuf said on that.


Allowing Public Users To Join


The "social" site allows anybody to join up and create
an account. This means that somehow the web application
must be able to create accounts on the database server.
Yet it must do this without allowing the web code to
elevate its privileges, and while preventing the disaster
that would ensue if a user on the "social" site somehow
got himself an account on the "finance" site.


Believe it or not, this is the easy part! Here is how it
works for the "social" site:


  • Create a table of users. The primary key is the user_id
    which prevents duplication.
  • For the social site, there is a column called
    PASSWORD that stores the password in plaintext.
  • Allow the anonymous account to INSERT into this table!
    (Remember though that deny-by-default means that so far
    this account has no other privileges).
  • Put an INSERT trigger on the table that automatically creates
    an aliased user account, so that "johnsmith" becomes
    "social_johnsmith". The trigger also sets the password.
  • A DELETE trigger on the table would delete users if
    the row is deleted.
  • An UPDATE trigger on the table would update the password
    if the user UPDATES the table.
  • Row level security is an absolute must.
    Users must be able to
    SELECT and UPDATE table, but only their own row. If your
    database server or framework cannot support row-level
    security, it's all out the window.


This gives us a system that almost gets us where we need
to be: the general public can create acounts,
the web application does not need to elevate its privileges,
users can set and change their passwords, and no user can
see or set anything for any other user. However, this leaves
the issue of password recovery.


In order to recover passwords and email them to members of
the "social" site, it is tempting to think that
the anonymous account must be able to
somehow read the users table, but that is no good because
then we have a structural flaw where a successful
SQL injection would expose user accounts. However, this
also turns out to be easy. There are two options:


  • Write a stored procedure that the anonymous user is
    free to execute, which does not return a password but
    actually emails it directly from within the database
    server. This requires your database server be able to
    send emails. (Postgres can, and I assume SQL Server
    can, and I don't really know about mySql).
  • Create a table for password requests, allow inserts
    to it but nothing else. A trigger sends the email.
    In this approach you can track email recovery requests.


For the "finance" application we cannot allow any of this
to happen, so again we go to the deny-by-default idea. All
of the behaviors above will not happen unless the programmer
sets a flag to turn them on when the database is built.


This does leave the detail of how users of the "finance"
application will reset their passwords.
For details on how a secure app can still allow password
resets, see my posting of Sept 7 2008 "http://database-programmer.blogspot.com/2008/09/advanced-table-design-secure-password.html"
>Secure Password Resets
.


One More Detail on Public Users


We still have one more detail to handle for public users.
Presumably a user, having joined up, has more privileges than
the anonymous account. So the web application must be able
to join them into a group without elevating its privileges.
The solution here is the same as for creating the account:
there will be a table that the anonymous user can make
inserts into (but nothing else), and a trigger will join
the user to whatever group is named.


Except for one more detail. We cannot let the user join
whatever group they want, only the special group for members.
This requirement can be met by defining the idea of a "freejoin"
group and also a "solo" group. If the anonymous user inserts
into a user-group table, and the requested group is flagged
as allowing anybody to join, the trigger will allow it, but
for any other group the trigger will reject the insert.
The "solo" idea is similar, it means that if a user is in
the "members" group, and that group is a "solo" group, they
may not join any other groups. This further jails in
members of the general public.


Almost Done: User Administration


In the last two sections we saw the idea of a table of users
and a cross-reference of users to groups. This turns out to
solve another issue we will have: letting administrators
manage groups. If we define a group called "user_administrators"
and give them total
power on these tables, and also give them CRUD screens
for them, then we have a user administrator system.
This works for both the "social" and the "finance" application.


The triggers on the table have to be slightly different
for the two cases, but that is a small exercise to code
them up accordingly.


Cross-Database Access


Believe it or not, the system outlined above has met all of
our requirements except one. So far we have a system that never
requires the web server to have any elevated priveleges within
the database, allows members of the public to join some sites
while barring them from others, is structurally immune from
SQL injection, allows different people on different sites to
have the same user id, and allows administrators
of both sites to directly manage accounts. Moreover, we
can handle both plaintext passwords and more serious
reset-only situations.


This leaves only one very thorny issue: cross-database
access. The specific database server I use most is PostgreSQL,
and this server has a problem (for this scenario) anyway,
which is that out-of-the-box, a database account can connect
to any database. This does not mean the account has any
priveleges on the database, but we very seriously do not want
this to happen at all. If a member of the "social" site can
connect to the "finance" app, we have a potential vulnerability
even if he has zero privileges in that database. We would be
much happier if he could not connect at all.


In Postgres there is a solution to this, but I've grown to
not like it. In Postgres you can specify that a user can only
connect to a database if they are in a group that has the
same name as the database. This is easy to set up, but it
requires changing the default configuration of Postgres.
However, for the sheer challenge of it I'd like to work out
how to do it without requiring that change. So far I'm
still puzzling this out. I'd also like to know that the
approach would work at very least on MS SQL Server and
mySql.


Conclusion


Most of what is in this week's essay is not that radical to
any informed database veteran. But to web programmers
who were unfortunate enough to grow up in the world
of relational-databases-must-die nonsense, it is probably
hard or impossible to imagine a system where users are
connecting with real database accounts. The ironic thing
is that the approached described here is far more secure
than any single sign-on system, but it requires the programmer
to shift thinking away from action-based code-centric models
to what is really going on: table-based privileges. Once
that hurdle is past, the rest of it comes easy.

Suni

Web Packaging: Creating a Web Package using VS 2010

0 komentar

In the earlier post I highlighted various investments that we are making in Visual Studio 2010 and IIS to make Web Deployment easier.  You can read that post below:

Deploying a web project with all its correct dependencies is not a trivial task. Some of the assets which need to be considered during deployment are:

  • Web Content (.aspx, .ascx, images, xml files, PDBs, Binaries etc)
  • IIS Settings (Directory browsing, Error pages, Default Documents etc)
  • Databases that the web project uses
  • GAC Assemblies and COM components which the web project depends upon
  • Registry Settings that may be used within the web project
  • Security Certificates
  • App Pools

In an enterprise environment a web application with all of its dependencies needs to move across various environments before being finally being deployed to a production server.  A typical set of transition servers are development, testing/QA, staging/pre-production and production.  Also on the production environment there are web farms where these webs need to be replicated.  Today doing all these things is more or less a manual process and involves a tons of documentation that both developers and server admins have to deal with.  Even with all the documentation the steps are certainly very much prone to errors.

To aid all these scenarios we are introducing the concept of  a "Web Package". Web Package is an atomic, transparent, self describing unit representing your web which can be easily hydrated onto any IIS Web server to reproduce your web.  VS 2010 uses MSDeploy  to create the web package from your web application.

In today's post I will be primarily focusing on creating a web package from VS 2010 which has IIS Settings as well as web content.

The package created by VS can be installed using UI in IIS Manager as well as command line, we anticipate that developers eventually will give the web packages to server administrators who will be able to inspect/verify the package and then install them on the server...  I will cover package installation topic in subsequent post...  But for now let us learn how to create a web package

Step 1: Configure your Web Application Project (WAP) to use IIS Settings

For this discussion we have BlogEngine.Web downloaded from codeplex and converted it into a WAP.  Then this project was opened in VS 2010  and the VS10 migration wizard moved the project into VS10 format.  Thanks to the multi-targeting  features in VS 2010 which can support .NET versions 2.0 till 4.0; hence it is up to you which Framework version you want to run your web against.    I have also configured this blog application to use IIS Web Server for development (Learn how to do so by clicking here). 

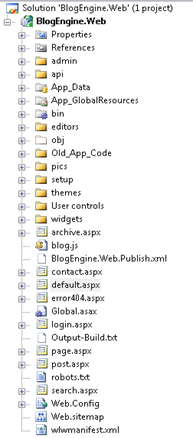
At the end of this step my solution explorer looks as below:

image

Step 2: Configure IIS Settings in IIS Manager

Most IIS 7 web applications use IIS integrated pipeline which is configured with "Default App Pool" of IIS.  Blog Engine .web does not use integrated mode and will throw an error shown below if made to run under "Default App Pool".

image

To get rid of this error I changed the App Pool of this application to "Classic App Pool" (Learn how to do so by clicking here) and then the application runs great as shown below:

image

App Pool mapping is just one of the IIS setting which your app may use, there are various other IIS Settings which you can configure using IIS Manager (e.g. Default document, Error pages etc etc); all of these settings are relevant based on your application scenario... The good news is that VS 10 & MSDeploy will auto detect all the changes you make to the default IIS settings and pick it up for deployment...

Essentially, at the end of this step you should have your web application up and running with all the IIS settings configured in IIS Manager. 

Step 3: Configure Package Settings

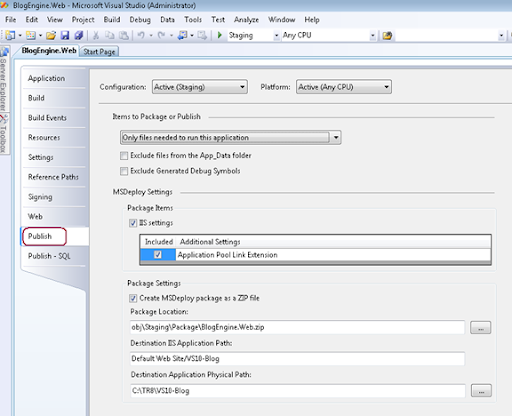
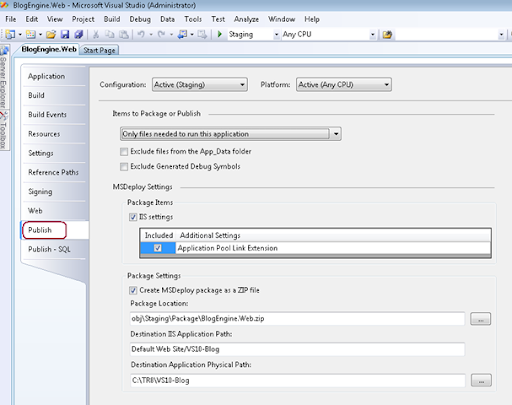
In VS 2010 we have introduced one additional property page for WAPs called "Publish" as shown below:

image

Let us look at various properties of the this tab to understand how it works:

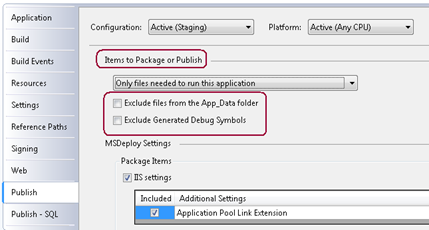
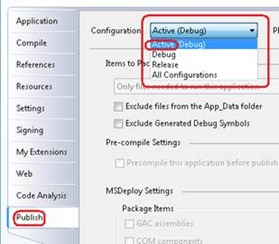
Configuration Aware Tab: Note that the Publish tab is build configuration aware:

image

  • The Publish tab is made configuration aware as deployment settings tend to change from environment to environment; for e.g. many a times developers want to deploy their “Debug” configuration on a Test Server and include PDBs as part of this deployment. When the same web is deployed in “Release” configuration on a production server the deployment may exclude PDBs.  (Learn how to manage build configurations by clicking here)

Items to Package/Publish – This section will help you decide what type of content you would really like to package/deploy.

  • Types of Files: By default this option is set to "Only files needed to run this application" .  This is usually sufficient for your deployment as it includes all the files from your project except source code, project files and other crud files not required to be deployed...  But apart from that there are two additional options available as shown below...

image

"All files in this project" and "All files in this project folder" options are very similar to what Publish WAP options were in VS 2008...  I had written an earlier post explaining these options here...  In subsequent posts I will also dig into various other interesting ways of using these options.

  • Exclude Files from App_Data folder – “App_Data” folder is a special ASP.NET folder where many developers like to put their SQL Express DBs (.mdf/.ldf files), XML files and other content which they consider Data. In many situations on production web server a full version of SQL Server is available and using SQL Express is not all that relevant. In such scenario (and for the corresponding build configuration e.g “Release” ) a user can check the “Exclude Files from App_Data”. image
  • Exclude Generated Debug Symbols – It is important to understand that generation of debug symbols is different from deployment of the same. This check box will tell VS 10 whether you would like to package/deploy the already generated Debug Symbols (Learn more about deploying debug Symbols here). 

Package Items

image 

  • IIS Settings  - Checking this checkbox informs VS10 that you are ready to take all of your IIS Settings configured for your application in IIS Manager as a part of your web package.  I am glad to tell you that IIS 5.1, IIS 6 as well as IIS 7 environments are supported as part of this feature hence whether you are working on XP, Win2K, Win2K3, Vista or Win2K8 you should have no issue with packaging IIS Settings...  

These setting includes the "App Pool mapping" your web is configured to run against (e.g. "Classic App Pool" mapping discussed in Step 2)

  • Additional Settings -   The items in this grid are advanced properties.  It is still good to know about these coz it impacts what will be included in your package.  Most of the properties in this grid are related to the entire server and not just to your application so you should use them very carefully. 

Currently VS10 only displays "Application Pool Settings" but behind the scene it is possible to configure VS10 to support packaging root web.config, machine config , security certificates, ACLs etc...  

I wrote a small tips & trick about differences between Application Pool Mapping and Application Pool Settings which will help clarify the implications of such advanced settings; you can read more about it here.

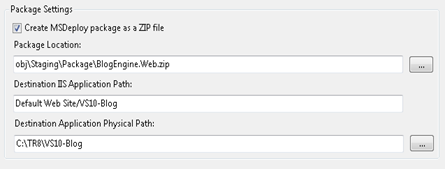
Package Settings

image

  • Create MSDeploy Package as a ZIP file - This checkbox allows you to decide whether you would like to create your web package as a .zip file or as a folder structure. If you are concerned about the size and are moving the web package around very often then I can see you using .zip format for the package; on the other hand if you care to compare two packages using diff commands (either of source control or independently) then I can see you using the folder format.
  • Package Location - This is an important and required property as it defines the path at which Visual Studio will place your web package. If you choose to change this path make sure that you have write access to the location. Do note that the Package Location is modified based on whether you choose to create the web package as a .ZIP file or vs a folder structure.
  • Destination IIS Application Path/Name - This property allows you to give IIS Application name that you will use at the destination Web Server.
  • Destination Application Physical Path - One of the most important information which is embedded inside the web package is the physical location where the package should be installed. This property allows you to pre-specify this embedded information.  You will have an opportunity change both IIS Application Physical Path as well as Application Name at the time of deployment but in this property page you are given an opportunity to choose a default value.

Step 4: Create the "Web Package"

This is the last step in creating the web package and the simplest too...  The idea is that once you configure the above settings creating a package should be easy; in fact even if you do not go to the "Publish" tab we have tried to set smart defaults so that in most normal circumstances creating web package should be just the below two steps:

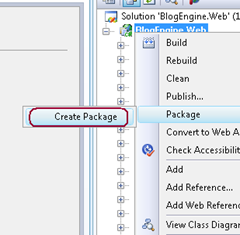
image

  • Right Click on your "Project"
  • Click on Package --> Create Package

Once you click on this command you should start getting output messages around your package creation pumped into your output window... 

When you see “Publish Succeeded” as below in the output window then your package is successfully created.


image

To access the package go to the location specified in the “Package Location” textbox. By default this is in obj/Configuration/Package folder under your project root directory (Configuration here implies Active Configuration like Debug/Release etc).

clip_image002

Note: "Create Package" command creates web package only for Active configuration. By default “Debug” is the active configuration inside Visual Studio. If you would like to change the Active configuration you can do so by using Build --> Configuration Manager as described here. You can certainly set properties for all available configurations by switching the configuration on top of the “Publish” tab but that action does not change the Active configuration


Finally, you can also automate creation of web packages via your team build environment as everything discussed above is supported via MSBuild Tasks.  In subsequent posts we will get into the details of these areas too...

Hope this helps...

Suni

Tips & Tricks: Difference between App Pool Mapping Vs App Pool Settings

0 komentar

Application Pool is an IIS concept and will apply to an application which uses IIS as its web server.  Learn how to make your web application to use IIS during development time by clicking here...  If you application is an IIS based application then you should be able to look at its basic settings as below:

image

In this post I quickly wanted to discuss about the difference between App Pool Mapping and the actual App Pool Settings

  • App Pool Mapping - This is a setting limited to your web application in IIS...  This instructs IIS to identify the correct App Pool which your web application should run against.  It by no way changes any settings associated with the App Pool itself i.e. you are using an app pool which was pre-created/configured and essentially the settings of those app pool will now apply to you web application too...  I had earlier written a quick tip on how to change the App Pool used by your application which you can find here...
  • App Pool Settings - App Pool settings are stored in separate configuration file in IIS and they are manifested in IIS Manager UI as below:

image

You can create, edit, delete App Pools for the machine using the above options... Although the important point to note is that the same app pool can be used by various applications on the same server and changing an App Pool setting will impact all the applications running on the server.

In anycase, if you would like to modify the App Pool Settings you can do so by clicking the "Edit Application Pool" settings as shown in the diagram above

Some of the Advanced settings which can be modified for an application pool are as shown in the figure below:

image

So in nutshell, it is important to understand that when you change app pool settings on your developer box then they will not automatically reflect on the server unless it is explicitly modified.

Also the reason why server admins are reluctant to modify a particular app pool's settings on the server is coz it may impact many other applications on the server who are using the same app pool. 

Some server admins create different app pools for different webs to ensure that other applications on the server are not impacted by individual application change requests to the app pool.

Hope this helps...

Suni

Tips & Tricks: Deploying Generated Debug Symbols for your Web

0 komentar

Many developers always generate debug symbols so that they can be used to debug even the production environment if need be and to a great extent this can be considered as a best practice, but that does not mean that organizations deploy their Debug Symbols.

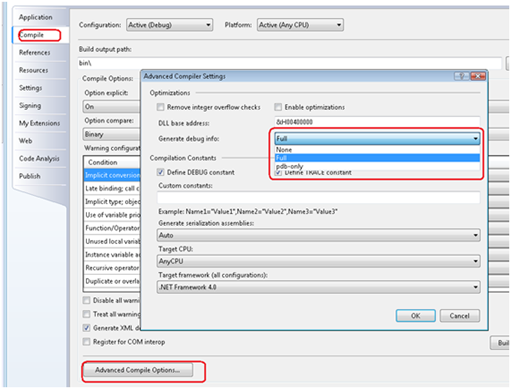
If you would like to generate debug symbols for your application you can do so by going to the “Build” tab in the Property Pages and clicking “Advanced” bottom at the bottom. Here you will have different options for the level of debug symbols you would like to generate for your Web Application Projects (WAP)

C#

image

VB

image

Generation of Debug symbols can be configured per "Build Configuration"...  To learn more about managing build configurations click here

Hope this helps...

Suni

Tips & Tricks: Managing environment specific properties by using Configuration Manager

0 komentar

Many property pages of a project (File --> New --> Project --> Web Application Project) support Configuration  specific properties:

image

What this essentially means is that all the properties in that tab can be saved in the project file and will be saved per configuration.  This would mean that when your active configuration is "Debug" then all the "Debug" settings will be used.

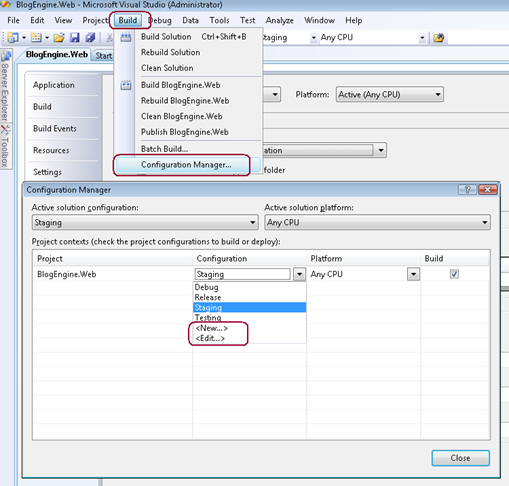
Debug and Release configurations are available by default inVisual Studio but if you would like to add more build configurations (for various server environments like “Dev”, “QA”, “Staging”, “Production” etc then you can do so by going to the Build --> Configuration Manager.

image

You can also select your active configuration for Visual Studio 10 from the Configuration Manager UI as shown above.

The configurations are stored in the project file as shown below:

image

Note: Deleting a configuration for the solution does not delete it for every project within the solution and visa versa, so when using Configuration Manager make sure that you remove the configurations from the correct locations

Hope this helps...

Suni

Tips & Tricks: How to change the App Pool which is used by your web application

0 komentar

If you would like to use advanced IIS features and configuration on your development machine then you first need to make your web application use IIS Web Server for development.  You can do so as described below:

Once you app is using IIS you can go to IIS Manager by going to Start --> Run and typing Inetmgr... In IIS Manager navigate to your application (which will be typically under "Default Web Site")

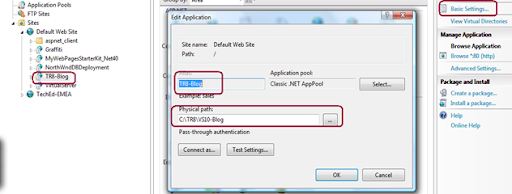
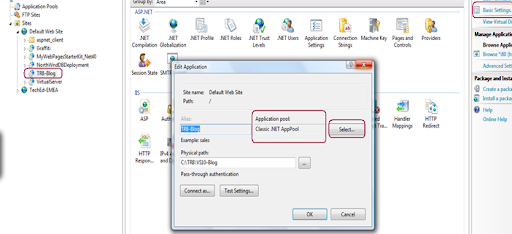
Now click on the "Basic Settings" as shown below and change the app pool by clicking the "Select"  button:

image

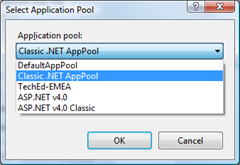
All the available app pools on your machine will be shown in the select drop down as below:

image

e.g. Default App pool to use IIS Integrated Pipeline (Learn more by clicking here), Classic .Net App Pool for non integrated mode...

Hope this helps...

Suni

Tips & Tricks: How to use IIS as your local Web Development Server...

0 komentar

When you create a new web application project (WAP) by going to File --> New --> Project --> Web Application Project then the default Web server used is "Visual Studio Development Server"  (fondly named as 'Cassini')...

Cassini does not require you to run as a local administrator on the dev box and hence is something which is preferred by a lot of enterprises.  At the same time Cassini is not an exact representation of how your production web server will look like.  As your production web server is typically an IIS Web Server, Visual Studio also allows you to use IIS as your development web server...

Although many operations related to IIS require you to be a local administrator of your box...  If you would like to use IIS as your development web server than you need to make sure you are running Visual Studio in an administrator mode.

After you do so, you can right click on your WAP --> Click Properties and open the Property pages of the project.  Now you can navigate to the "Web" tab of the property page and select "IIS Web Server" as shown below...

image

You can then click the "Create Virtual Directory" button and your IIS application + VDir will be created... Going forward when you debug or run the Web Application from Visual Studio then your application should use all of the IIS Settings that you configure using IIS Management Console (Start --> Run --> Inetmgr)...

Note: Do note that Visual Studio uses IIS Metabase Compatibility mode to actually access IIS functions so you need to go to Start --> Control Panel --> Programs & Features --> Add or Remove Windows Components / Turn Windows features on or off and make sure below features are enabled:

image

Hope this helps...

Suni

The file is too too large for the destination file system

0 komentar
Big files can not copy on USB drive


Some time people call me or mail me and ask me that they are not able to copy a bigger file from their computer to their USB hard drive and I do have a two simplest solution for them either you are not logged in as administrator user or your USB drive is formatted as FAT 32 and in most of the cases both the thing they find correct.

First thing you should check whether your USB hard drives partition is NTFS or FAT32. If its partitioned as FAT32 then you can convert the FAT partition in NTFS without any problem using a simple command as bellow.

convert drivename: /fs:ntfs

If this command doesn�t work for you then I would recommend you to contact your USB drive support centre so they can assist you for this. The other way to get the partition is that you format the drive as NTFS but that could make a loss of one click backup and other functionality of your USB Hard drive

If this is not the case then there is second thing that�s stopping you to copy that bigger file in your USB drive that you are not logged in as administrator user. If you are not logged in as administrator user then it would not allow you to copy a bigger file so first enable administrator user and then copy the data using that administrator account.

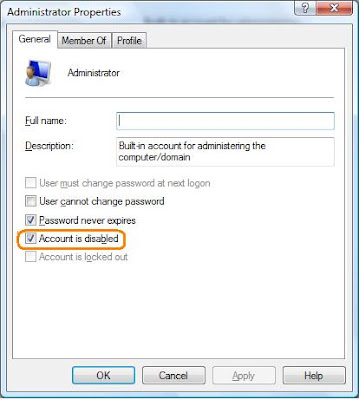
By Default in Vista and Windows XP administrator account remain disable you need to enable them before logging in. Here is process for enabling administrator user in xp and vista.

1) Write click on my computer and click on manage.
2) Find local users and group->users and then find the administrator user.
3) right click on user go to it properties and deselect Account it disabled checkbox.
4) Now set the password of administrator user and now you are ready to login as administrator user.
Enable administrator user in windows XP and Vista
For login press ctrl+alt+del it will give you classic login screen give user name as administrator and password and login.

I hope it was useful for you and you enjoyed it
Thanks for being here
AP
www.techraga.com

Suni

Scan File with more than 36 antivirus at same time

0 komentar
Scan your file with 36 Antivirus without installing them


Last Saturday I was chatting with one of my friend and saw that he was playing some song that was downloaded from a domain that is infamous for spreading virus with their mp3 songs. I said him that you should not use these kinds of files that are downloaded from infamous location for viruses.
He said yes he knows about it but he was not able to find those songs anywhere else and he was dying to hear those songs. He asked some suggestion for me and I had the best solution for him as www.virustotal.com this is a site that scan your file with multiple antivirus and it gives you a complete satisfaction that your downloaded file is not infected with virus or it is infected with virus.
For testing some particular file you just need to upload the file and it will give you scanned result in a short time.
After his question I thought I should write about VirusTotal on my blog but I had few question in my mind and I did not want to write about www.virustotal.com on my blog so I sent a mail to info@virustotal.com and I they gave me answer of all of my question in just couple of hours in a trail of 4 mails so I can assure my blogs reader that its very reliable also
I had following question for them and answers are there ..

Question: At present you give scan with how many antivirus?
Answer: 39. There are also some internal betas from several AV vendors, but that
Results are not shown in the reports.
Question: If it�s a 5 MB file how much time it will take to scan that file completely?
Answer: There's no any specific answer to that question. Scanning time doesn't depend only on the size of the file, but on its nature, and how it behaves with each scanner heuristic features. That way, a given 50K file can take far longer to scan than a 5MB file
Question: Do you support other compressed file other than zip, If yes how many?
Answer: Files are scanned in the same format they're sent, so compression support depends on each scanner. Some support more formats than others
Question: what is the maximum size of file can be scanned from your server?
Answer : The size limit at this moment is 20MB
Question : you scan these file on your own server or you scan them using online virus scanner engine of different antivirus online scanner?
Answer : Samples are scanned in our own servers, although some scanners use 'in the cloud' technology that somehow would get into an hybrid approach so to say.
If you want to talk about virutotal.com please do talk here in my www.techraga.com forum
Please visit here for more specification
I hope it was useful for you and you enjoyed it
Thanks for being here
Suni

Tawk.to